Use Terraform and Ansible to Deploy a WireGuard VPN Server on Azure
Learn how to use IaC to deploy and manage your own vpn server

Introduction
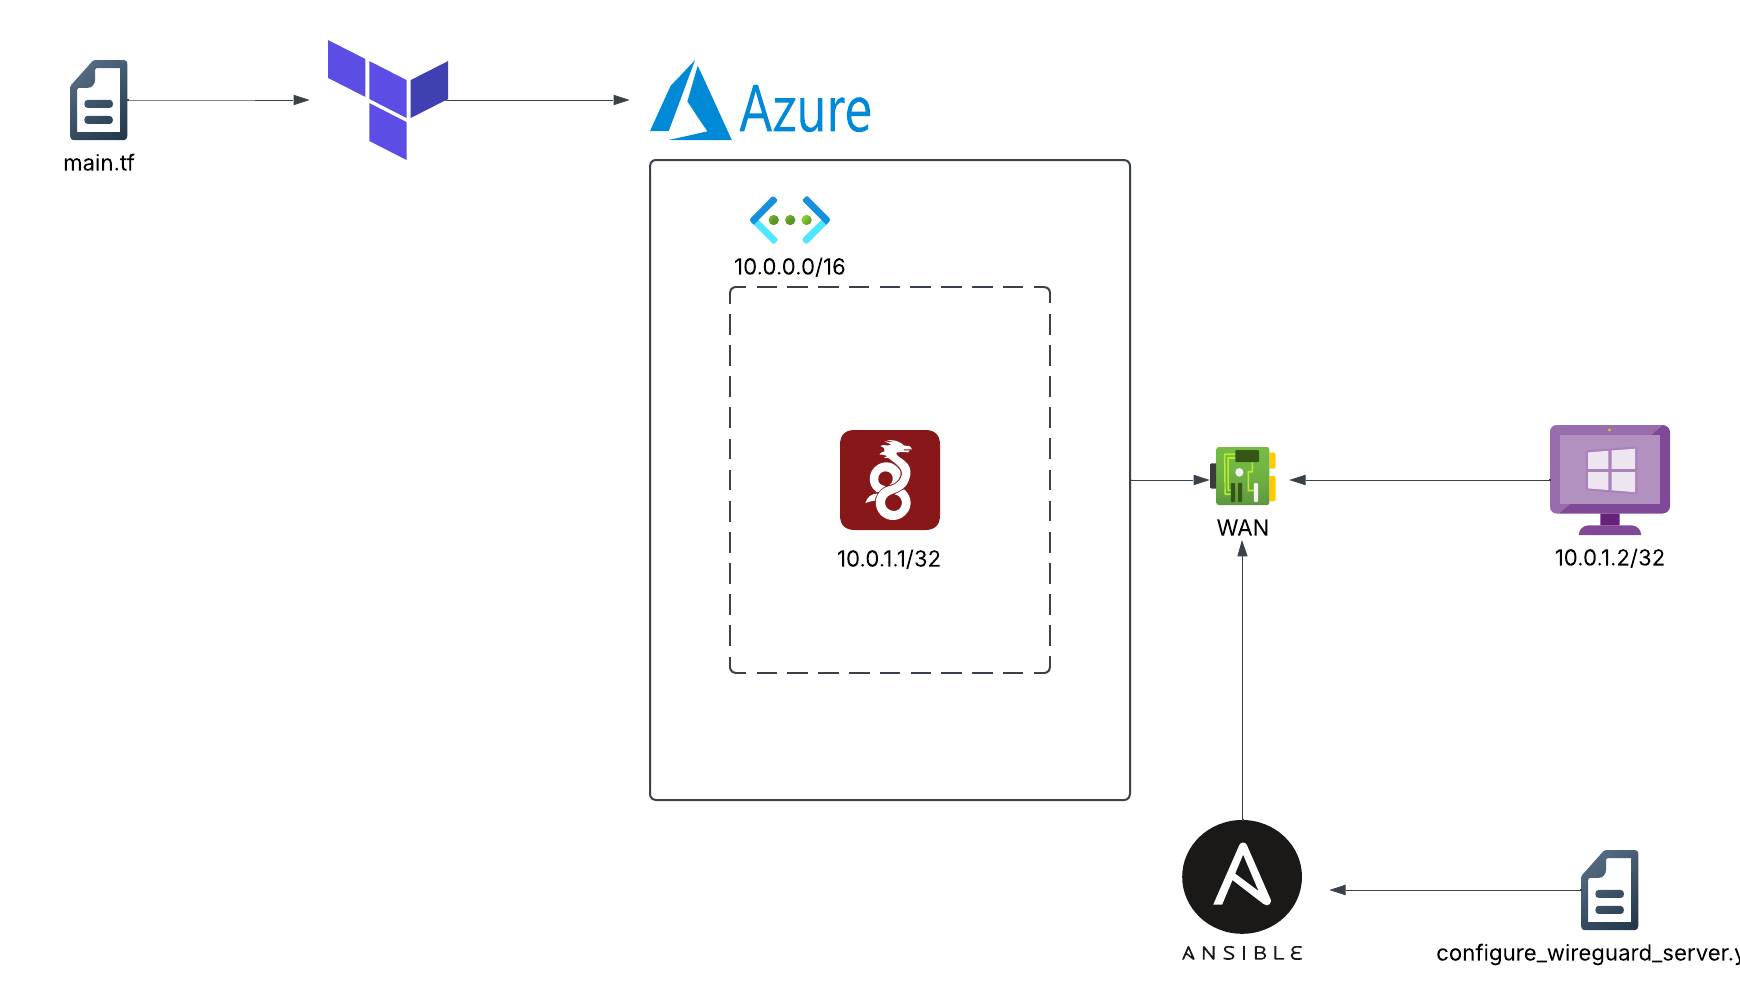
Nowadays, we are frequently being advertised about online security and how VPNs can improve it. It is common to stumble across a sponsored VPN advertisement—NordVPN, ExpressVPN, etc. Nonetheless, they tend to be expensive. In this tutorial, you will learn how to deploy your own VPN server in Azure using Terraform and Ansible to automate the deployment process.
Project Diagram
Prerequisites
To complete this tutorial you require:
- An Azure account where you can deploy virtual machines
- Terraform running either locally or on cloud
- An Ansible control node (can be your local machine)
- A client to test the VPN
Organizing the Environment
Start by creating two directories to separate the Ansible and Terraform scripts To avoid installing Ansible directly in your machine, I recommend that you create a Python virtual environment and install Ansible there. I will use a directory named az_keys to store the ssh keys of the VPN server.
1
2
lab/wireguard-iac/ansible took 5s
❯ python3 -m venv ansible-wireguard
By completing the above steps you will end up with a directory structure similar to this one:
1
2
3
4
5
6
7
8
9
wsl@ideapad:~/projects/wireguard_deployment$ tree -C -d -L 2
.
├── ansible
│   ├── ansible-python
│   └── wireguard_cfg
└── terraform
    └── az_keys

6 directories
Working with Terraform
Installing the Azure Provider
Create three files inside the terraform directory: main.tf, variables.tf, outputs.tf.
1
2
3
wireguard-iac/terraform on main [✘!?] via 💠 wireguard_project
❯ ls
main.tf outputs.tf variables.tf
Declare the Azure provider in the main.tf file.
1
2
3
4
5
6
7
8
9
10
11
12
terraform {
    required_providers {
        azurerm = {
            source = "hashicorp/azurerm"
            version = "4.30.0"
        }
    }
}

provider "azurerm" {
    features {}
}
Install the provider using the terraform init command.
Coding the Infrastructure
To deploy a virtual machine in Azure using Terraform we require to have the following resources declared in the main.tf file:
- resource group: where all our resources will be allocated
- network resources:
- virtual network: a virtual network (similar to AWS VPCs) for the vm
- subnet: the internal vm’s subnet
- public ipv4: for our Wireguard peer to use as endpoint
- network interface: to enable networking in the server
- security group: a set of rules to allow/disallow certain traffic for the vm
- virtual machine: declares and creates the vm itself
Declaring the Resource Group
Begin by declaring the resource group. Specify the name and the location—the region of the data center—. In the following code as in the rest of the tutorial, I will write the contents of the variables.tf file that correspond to the code:
1
2
3
4
5
6
7
8
9
10
11
variable "resource_group_name" {
    description = "name of resource group"
    type = string
    default = "cloudLab"
}

variable "azure_location" {
    description = "azure location"
    type = string
    default = "westus2"
}
1
2
3
4
resource "azurerm_resource_group" "tf_resource_group" {
    name = var.resource_group_name
    location = var.azure_location
}
Declaring the Network Resources
The Wireguard server will require a virtual network and internal subnet for internal networking. It also requires a public ipv4 address. After declaring such resources, we have to declare the virtual nic to attach those resources to:
1
2
3
4
5
6
7
8
9
10
11
12
13
14
15
16
17
18
19
20
21
22
23
variable "virtual_network_name" {
    description = "name for vnet"
    type = string
    default = "cloudVnet"
}

variable "internal_subnet_name" {
    description = "name for vnet subnet"
    type = string
    default = "internal"
}

variable "public_ip_resource_name" {
    description = "name of the resource using the public ip"
    type = string
    default = "wireguardIP"
}

variable "nic_name" {
    description = "name for the lab nic"
    type = string
    default = "labNic"
}
1
2
3
4
5
6
7
8
9
10
11
12
13
14
15
16
17
18
19
20
21
22
23
24
25
26
27
28
29
30
31
32
33
resource "azurerm_virtual_network" "tf_virtual_network" {
    name = var.virtual_network_name
    address_space = [ "10.0.0.0/16" ]
    location = azurerm_resource_group.tf_resource_group.location
    resource_group_name = azurerm_resource_group.tf_resource_group.name
}

resource "azurerm_subnet" "tf_subnet" {
    name = var.internal_subnet_name
    resource_group_name = azurerm_resource_group.tf_resource_group.name
    virtual_network_name = azurerm_virtual_network.tf_virtual_network.name
    address_prefixes = [ "10.0.2.0/24" ]
}

resource "azurerm_public_ip" "tf_wireguard_ip" {
    name = var.public_ip_resource_name
    resource_group_name = azurerm_resource_group.tf_resource_group.name
    location = azurerm_resource_group.tf_resource_group.location
    allocation_method = "Static"
}

resource "azurerm_network_interface" "tf_nic" {
    name = var.nic_name
    location = azurerm_resource_group.tf_resource_group.location
    resource_group_name = azurerm_resource_group.tf_resource_group.name

    ip_configuration {
        name = "internal"
        subnet_id = azurerm_subnet.tf_subnet.id
        private_ip_address_allocation = "Dynamic"
        public_ip_address_id = azurerm_public_ip.tf_wireguard_ip.id
    }
}
Declaring the Firewall Rules
Firewall rules can be managed with Azure using a Security Group. Incomming SSH traffic must be allowed so that Ansible can manage our server. Wireguard traffic must be allowed to. Create a TCP rule to allow inbound traffic destinated to port 22, and create another rule to allow inbound UDP traffic to port 51820:
1
2
3
4
5
variable "security_group_name" {
    description = "security group name"
    type = string
    default = "wireguard_rules"
}
1
2
3
4
5
6
7
8
9
10
11
12
13
14
15
16
17
18
19
20
21
22
23
24
25
26
27
28
29
resource "azurerm_network_security_group" "tf_security_group" {
    name = var.security_group_name
    location = azurerm_resource_group.tf_resource_group.location
    resource_group_name = azurerm_resource_group.tf_resource_group.name

    security_rule {
        name = "SSH"
        priority = 1001
        direction = "Inbound"
        access = "Allow"
        protocol = "Tcp"
        source_port_range = "*"
        destination_port_range = "22"
        source_address_prefix = "*"
        destination_address_prefix = "*"
    }

    security_rule {
        name = "WIREGUARD"
        priority = 1002
        direction = "Inbound"
        access = "Allow"
        protocol = "Udp"
        source_port_range = "*"
        destination_port_range = "51820"
        source_address_prefix = "*"
        destination_address_prefix = "*"
    }
}
Associate the above rules with the corresponding server’s network interface:
1
2
3
4
resource "azurerm_network_interface_security_group_association" "tf_sec_group_association" {
    network_interface_id = azurerm_network_interface.tf_nic.id
    network_security_group_id = azurerm_network_security_group.tf_security_group.id
}
Declaring the Virtual Machine
The declaration of a virtual machine consists on basic information, ssh information, disk, and the desired image. We need to specify the size of the VM with the size = "Standard_D2s_v3" line. All VM sizes can be fetched with az vm list-sizes --location westus2 --output table.
As my server is not expected to run for a long period of time, I will declare the machine to be a Spot machine so it will not be that expensive, finally, I decided to use Ubuntu Server as the VM’s image:
1
2
3
4
5
6
7
8
9
10
11
12
13
14
15
16
17
18
19
20
21
22
23
24
25
26
27
28
29
30
31
32
33
34
35
36
37
38
39
40
41
42
43
44
45
46
47
variable "wireguard_server_name" {
    description = "name for wireguard VM"
    type = string
    default = "wireguardServer"
}

variable "admin_username" {
    description = "username for vm administrator"
    type = string
    default = "adminuser"
}

variable "vm_priority" {
    description = "VM priority"
    type = string
    default = "Spot"
}

variable "vm_publisher" {
    description = "vm publisher name"
    type = string
    default = "Canonical"
}

variable "vm_offer" {
    description = "vm offer"
    type = string
    default = "ubuntu-24_04-lts"
}

variable "vm_sku" {
    description = "vm type (sku)"
    type = string
    default = "ubuntu-pro"
}

variable "vm_version" {
    description = "vm version"
    type = string
    default = "latest"
}

variable "admin_ssh_key" {
    description = "public SSH key"
    type = string
    default = "./az_keys/id_ed25519.pub"
}
1
2
3
4
5
6
7
8
9
10
11
12
13
14
15
16
17
18
19
20
21
22
23
24
25
26
27
resource "azurerm_linux_virtual_machine" "tf_wireguard_server" {
    name = var.wireguard_server_name
    resource_group_name = azurerm_resource_group.tf_resource_group.name
    location = azurerm_resource_group.tf_resource_group.location
    size = "Standard_D2s_v3"
    admin_username = var.admin_username
    network_interface_ids = [ azurerm_network_interface.tf_nic.id ]
    priority = "Spot"
    eviction_policy = "Delete"

    admin_ssh_key {
        username = var.admin_username
        public_key = file(var.admin_ssh_key)
    }

    os_disk {
        caching = "ReadWrite"
        storage_account_type = "Standard_LRS"
    }

    source_image_reference {
        publisher = var.vm_publisher
        offer = var.vm_offer
        sku = var.vm_sku
        version = var.vm_version
    }
}
Declaring the inventory file
We can create the inventory.ini file using Terraform with the local-exec provisioner:
1
2
3
4
5
resource "null_resource" "tf_inventory_file" {
  provisioner "local-exec" {
        command = "echo '[wireguard]\n${azurerm_public_ip.tf_wireguard_ip.ip_address}' > ./../ansible/inventory.ini"
  }
}
Output Variables
As I used Terraform Cloud for this project, I will not be able to automate the creation of the inventory.ini file and run the playbook using Terraform. I declared an output for Terraform to display the server’s ip once it has been created:
1
2
3
output "wireguard_server_ip" {
    value = azurerm_public_ip.tf_wireguard_ip.ip_address
}
Building the Infrastructure
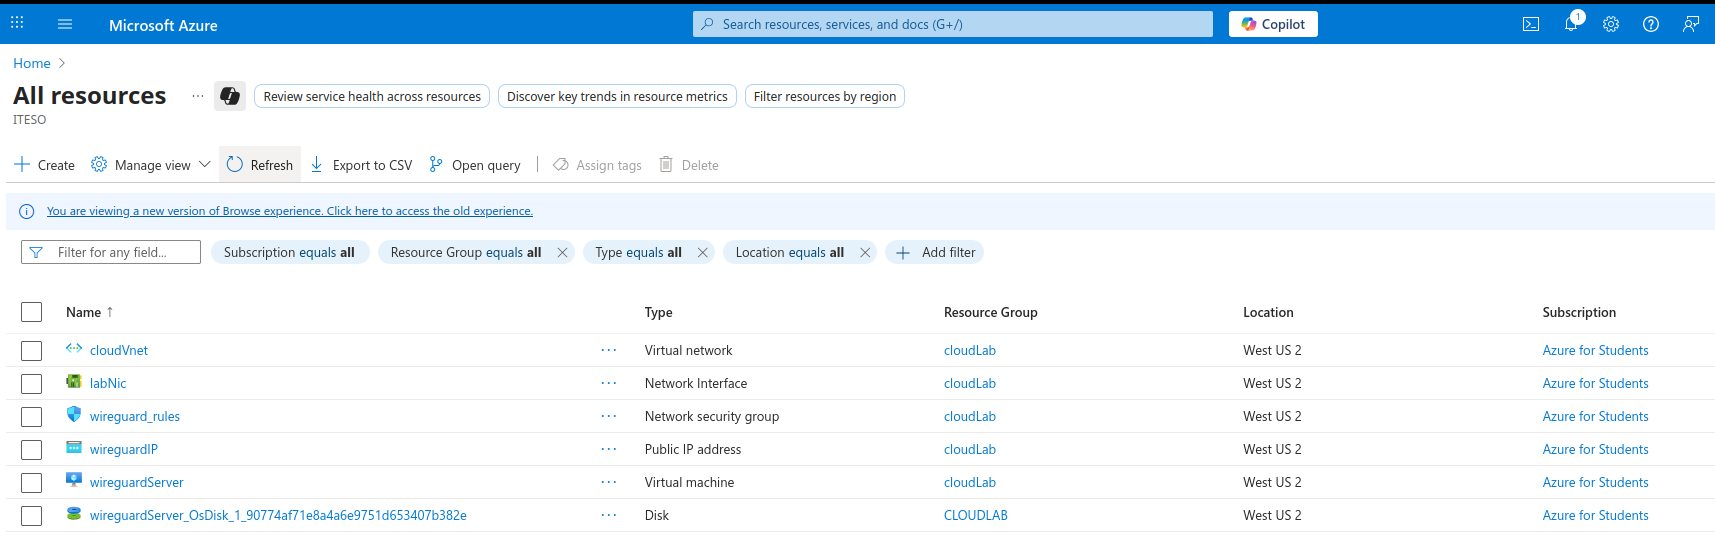
Verify the infrastructure has been created once you run terraform apply, using either terraform state list or az resource list. The simpliest way is to go to the Azure web CLI and check:
Working with Ansible
Defining Wireguard Keys
For ease of deployment, I will generate a Wireguard key pair to use the same keys for every deployment. Make sure to create as well the peer’s key pair:
1
2
3
4
5
6
7
root@2dd1a25d6e92:/# privkey=$(wg genkey)
root@2dd1a25d6e92:/# pubkey=$(echo $privkey | wg pubkey)
root@2dd1a25d6e92:/# echo $privkey
AEU89XiI5fCEt0uf//oMeQuAvrq2xK0F0ojNiT3Yylw=
root@2dd1a25d6e92:/# echo $pubkey
068hN+0KqS45eUW/fFLsvAcnINtDs76d+jv4lva5pkM=
root@2dd1a25d6e92:/#
Building the Playbook
Defining Variables in the Playbook
We will store important information for the server in the variable section, such as the server key pair, the peer’s public key, and the server’s listening port. The private key must be encrypted in the playbook, we can use ansible-vault to encrypt a string and then paste it in the playbook:
1
2
3
4
5
6
7
8
9
10
11
12
13
14
15
wireguard-iac/ansible on main [✘!] via 🐍 v3.13.3 (ansible-wireguard) took 5s
❯ ansible-vault encrypt_string --ask-vault-password --stdin-name server_privkey
New Vault password:
Confirm New Vault password:
Reading plaintext input from stdin. (ctrl-d to end input, twice if your content does not already have a newline)
AEU89XiI5fCEt0uf//oMeQuAvrq2xK0F0ojNiT3Yylw=
Encryption successful
server_privkey: !vault |
$ANSIBLE_VAULT;1.1;AES256
33336361613231326261343431646635623536343537366534313236363163393663666665373031
3365326439626362393665343466393237333564346236640a316163636166656566363537303538
63383335386234366262346535653266383138383638366166386136393638333265663061623734
3332343966336534370a373434383538663364633331316238343163306236306161626331353233
64303031396430613666656235663932636530303035653038623839653030633831643365313364
3264333934666433303436633631373839646131366638613865
Once the private key has been encrypted, the playbook will look like this:
1
2
3
4
5
6
7
8
9
10
11
12
13
14
15
16
---
- name: configure wireguard
  hosts: wireguard
  vars:
    server_privkey: !vault |
          $ANSIBLE_VAULT;1.1;AES256
          33336361613231326261343431646635623536343537366534313236363163393663666665373031
          3365326439626362393665343466393237333564346236640a316163636166656566363537303538
          63383335386234366262346535653266383138383638366166386136393638333265663061623734
          3332343966336534370a373434383538663364633331316238343163306236306161626331353233
          64303031396430613666656235663932636530303035653038623839653030633831643365313364
          3264333934666433303436633631373839646131366638613865
    server_pubkey: 068hN+0KqS45eUW/fFLsvAcnINtDs76d+jv4lva5pkM=
    peer_pubkey: OPGIE9QazqHipS1ecruHoOUsOoqkFsCAG00nhCTp7zk=
    listen_port: 51820
  become: yes
The configuration file for the server can be generated in the playbook using a .j2 file. The following configuration template will be used:
1
2
3
4
5
6
7
[Interface]
PrivateKey =
ListenPort =

[Peer]
PublicKey =
AllowedIPs = 10.0.1.2/32
Notice the config file contains the AllowedIPs field specifying that the server only allows traffic originating from the 10.0.1.2 peer.
Use the following ansible.cfg file for Ansible to contemplate information such as the SSH user, SSH private key, and inventory file:
1
2
3
4
5
[defaults]
inventory = inventory.ini
private_key_file = $HOME/projects/wireguard_deployment/terraform/az_keys/id_ed25519
host_key_checking = False
remote_user = adminuser
Declaring the Tasks
To get the server up and running we have to consider the following configurations:
- Enable ipv4 forwarding so that the server can forward network packets
- Create the Wireguard network interface
- Assign the server and peer ip
- Create the server’s config file
- Activate the Wireguard interface
- Set a NAT masquerading rule so that traffic originating from the Wireguard interface appears to originate from the internet facing interface
Begin by defining a task to install Wireguard and update the apt cache:
1
2
3
4
5
- name: install wireguard
  ansible.builtin.apt:
    name: wireguard
    state: present
    update_cache: yes
Define the tasks to enable ipv4 forwarding and to activate it:
1
2
3
4
5
6
7
- name: enable ipv4 forwarding
  ansible.builtin.shell:
    echo "net.ipv4.ip_forward=1" > /etc/sysctl.conf

- name: apply ipv4 forwarding
  ansible.builtin.shell:
    sudo sysctl -p
Then write the tasks to create the Wireguard interface and assign the server and peer addresses:
1
2
3
4
5
6
7
- name: create wireguard network interface
  ansible.builtin.shell:
    ip link add dev wg0 type wireguard

- name: assign server and peer ip
  ansible.builtin.shell:
    ip address add dev wg0 10.0.1.1 peer 10.0.1.2
Set the .j2 file as the config file and enable the Wireguard interface:
1
2
3
4
5
6
7
8
9
10
11
12
- name: create wireguard config file
  ansible.builtin.template:
    src: ./wireguard_cfg/wg0.j2
    dest: /home/adminuser/wg0.conf

- name: set wireguard config
  ansible.builtin.shell:
    wg setconf wg0 /home/adminuser/wg0.conf

- name: activate wg0 interface
  ansible.builtin.shell:
    ip link set up dev wg0
Define the NAT rule as follows:
1
2
3
- name: nat traffic rule
  ansible.builtin.shell:
    iptables -t nat -I POSTROUTING -o eth0 -j MASQUERADE
Running the Playbook
Run the playbook as follows and verify every task executed correctly:
1
2
wireguard-iac/ansible on main [✘!] via 🐍 v3.13.3 (ansible-wireguard) took 1m1s
❯ ansible-playbook --ask-vault-password configure_wireguard_server.yaml
If everything was executed successfully, you should see the following output at the end:
1
2
PLAY RECAP ***********************************************************************************************************************************************************************************
4.246.84.60                : ok=10   changed=9    unreachable=0    failed=0    skipped=0    rescued=0    ignored=0
Using the WireGuard Server
Configuring the peer
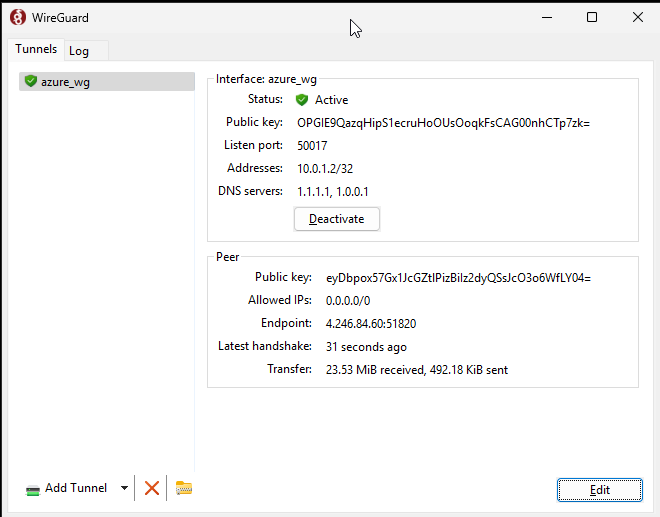
I will use a Windows PC as a Wireguard client, the configuration file should be like this:
1
2
3
4
5
6
7
8
9
[Interface]
PrivateKey = gI6EdUSYvn8ugXOt8QQD6Yc+JyiZxIhp3GInSWRfWGE=
Address = 10.0.1.2/32
DNS = 1.1.1.1, 1.0.0.1

[Peer]
PublicKey = 068hN+0KqS45eUW/fFLsvAcnINtDs76d+jv4lva5pkM=
Endpoint = 4.246.84.60:51820
AllowedIPs = 0.0.0.0/0
This configuration will use the Wireguard server as the endpoint, use cloudflare servers for DNS and will allow the peer to have access to the internet. It is necessary you set the AllowedIPs to 0.0.0.0/0 to allow traffic to have any ip as destiny.
Enable the Wireguard tunnel on the peer. A successfull handshake with the server will be indicated:
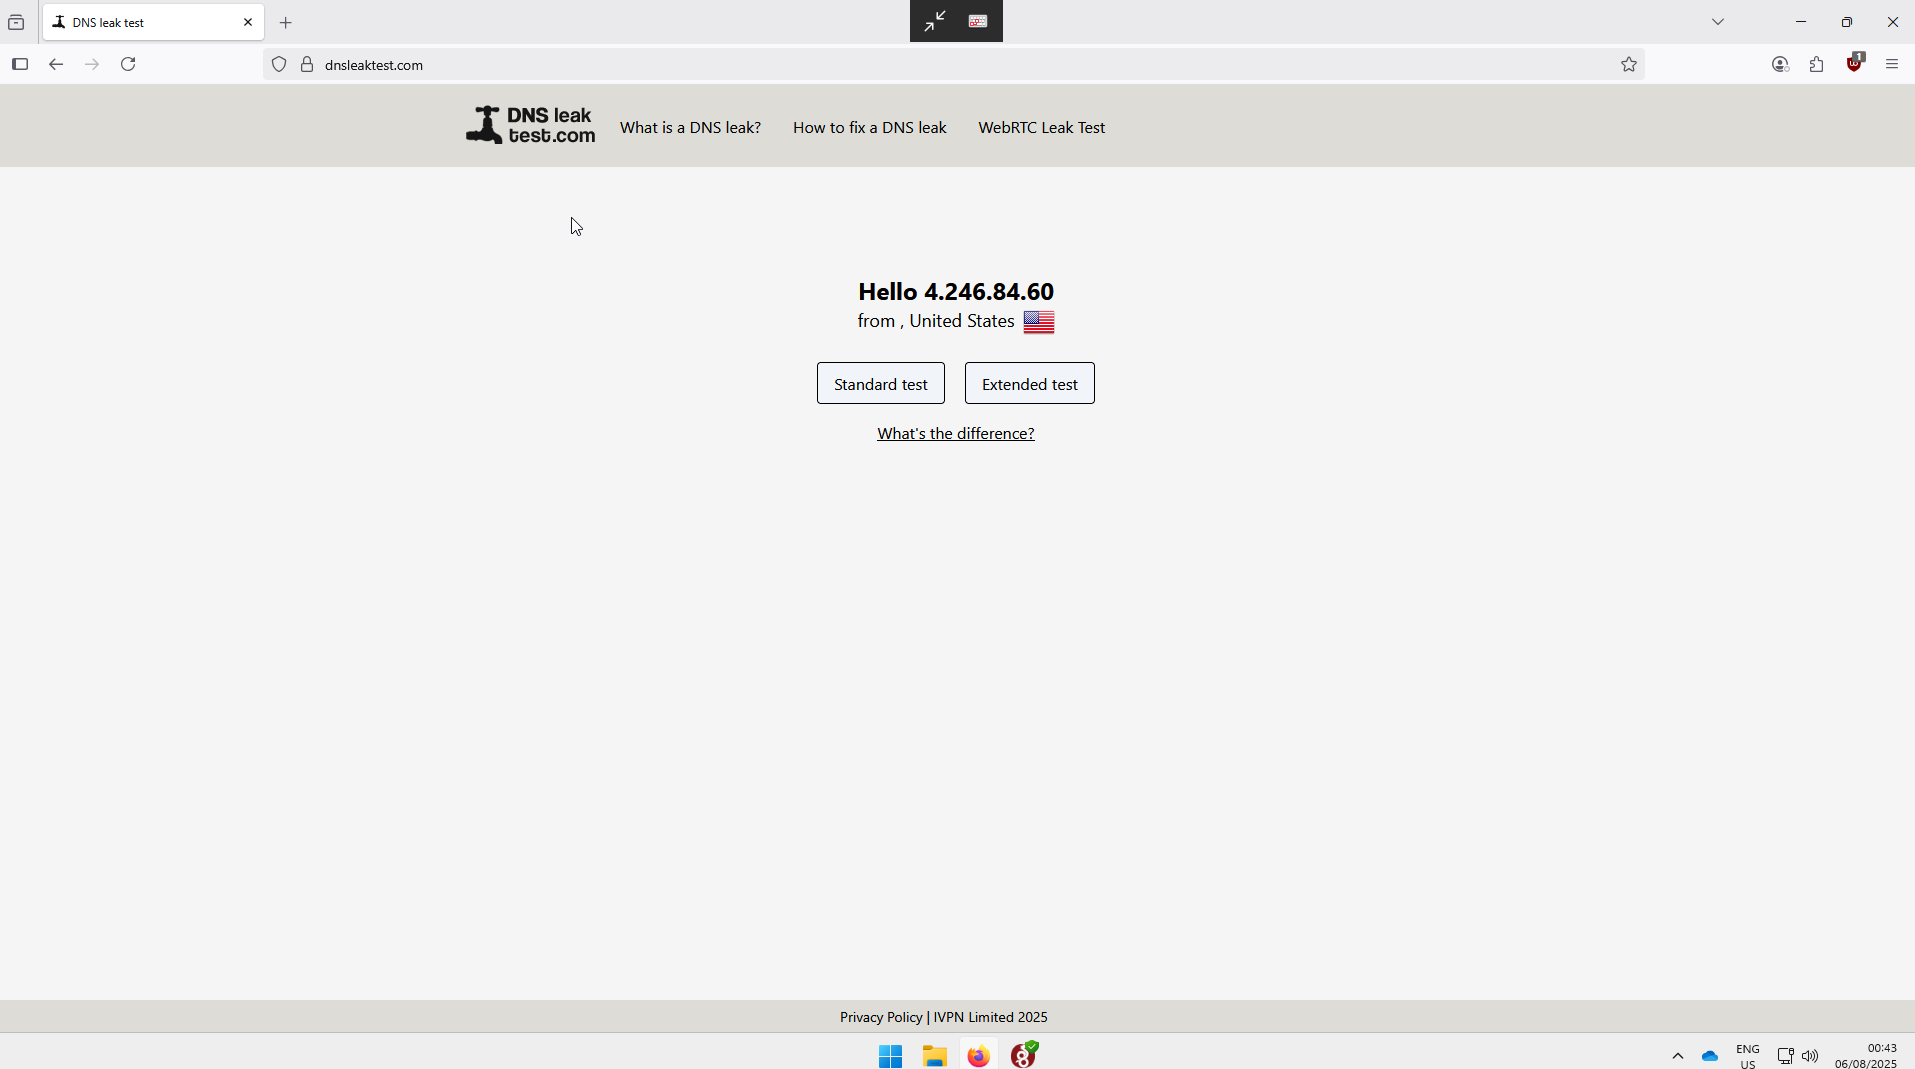
In the peer, go to the dnsleaks site and verify that the ip is indeed the server’s ip as this indicates that the VPN is working:
Conclusion
In this tutorial, you learned how to deploy a WireGuard server in Azure using Terraform and learned how to use Ansible to configure it, creating a cheap, easy to deploy, and secure alternative to commercial VPNs.