Automating the Installation of Debian with a Preseed File
A walkthrough about how to write a preseed file to automate the installation of a Debian system

Why Automate?
The process of installing a Linux distribution is enjoyable until you have to redo it multiple times. Even if further setups contain variations, you may forget to install something or overlook a specific step.
Automating the installation process can greatly improve a system’s scalability and reproducibility. Tools such as Ansible or scripts offer you automation capabilities for this.
In this walkthrough, I’ll show you how to automate the installation process of Debian using a preseed file, Debian’s default offer for automation.
The Preseed File
Debian uses a preseed file, a type of unattended file that answers the questions asked by Debian’s installer. It uses a similar syntax to shell scripts:
1
2
3
#_preseed_V1

<owner> <question name> <question type> <value>
Take the following example from Debian’s official documentation (notice how preseed files start with #_preseed_V1):
1
2
3
#_preseed_V1

di debian-installer/locale string en_US
I will be working with Debian’s preseed example as this can be used as a base file. First and foremost, define the correct locale and keyboard language according to your case:
1
2
3
4
5
6
### Localization
# Preseeding only locale sets language, country and locale.
d-i debian-installer/locale string en_US

# Keyboard selection.
d-i keyboard-configuration/xkb-keymap select us
Next, set the appropiate network configuration. In this case, all configurations will be automatically assigned via DHCP:
1
2
3
4
5
6
7
8
9
10
11
12
13
### Network configuration
# netcfg will choose an interface that has link if possible. This makes it
# skip displaying a list if there is more than one interface.
d-i netcfg/choose_interface select auto

# Any hostname and domain names assigned from dhcp take precedence over
# values set here. However, setting the values still prevents the questions
# from being shown, even if values come from dhcp.
d-i netcfg/get_hostname string unassigned-hostname
d-i netcfg/get_domain string unassigned-domain

# Disable that annoying WEP key dialog.
d-i netcfg/wireless_wep string
Set the mirror configuration that is more convenient for you. I will leave it as default:
1
2
3
4
5
6
7
8
9
### Mirror settings
# Mirror protocol:
# If you select ftp, the mirror/country string does not need to be set.
# Default value for the mirror protocol: http.
#d-i mirror/protocol string ftp
d-i mirror/country string manual
d-i mirror/http/hostname string http.us.debian.org
d-i mirror/http/directory string /debian
d-i mirror/http/proxy string
To create the root and user accounts with passwords assigned, follow the following schema:
1
2
3
4
5
6
7
8
9
10
11
12
13
### Account setup
# Skip creation of a root account (normal user account will be able to
# use sudo).
d-i passwd/root-login boolean false # EXPERIMENTAL

# Root password hashed with crypt(3)
d-i passwd/root-password-crypted password [crypt(3) hash]

# To create a normal user account.
d-i passwd/user-fullname string debian
d-i passwd/username string debian
# hashed password using a crypt(3).
d-i passwd/user-password-crypted password [crypt(3) hash]
A good security practice is to put the hash in the file. To generate a crypt(3) hash, use the mkpasswd utility from the whois. You will be asked for a password and the output will be the crypt(3) hash:
1
2
sudo apt install whois
mkpasswd
Add the correct timezone to the preseed file, in my case it will be America/Mexico_City:
1
2
3
4
5
6
7
8
9
10
### Clock and time zone setup
# Controls whether or not the hardware clock is set to UTC.
d-i clock-setup/utc boolean true

# You may set this to any valid setting for $TZ; see the contents of
# /usr/share/zoneinfo/ for valid values.
d-i time/zone string America/Mexico_City

# Controls whether to use NTP to set the clock during the install
d-i clock-setup/ntp boolean true
The disk where I will install Debian will be /dev/vda and I want it to be encrypted. Specify these configurations as follows in the preseed file. The very last line tells Debian to use the rest of free space in the partition scheme for the root partition:
1
2
3
4
5
6
7
8
9
10
11
12
13
### Partitioning
d-i partman-auto/disk string /dev/vda
# In addition, you'll need to specify the method to use.
# The presently available methods are:
# - regular: use the usual partition types for your architecture
# - lvm:     use LVM to partition the disk
# - crypto:  use LVM within an encrypted partition
d-i partman-auto/method string crypto

# You can define the amount of space that will be used for the LVM volume
# group. It can either be a size with its unit (eg. 20 GB), a percentage of
# free space or the 'max' keyword.
d-i partman-auto-lvm/guided_size string max
Avoid getting prompted to confirm if you prefer to erase old LVM configurations from the disk:
1
2
3
4
5
6
7
# If one of the disks that are going to be automatically partitioned
# contains an old LVM configuration, the user will normally receive a
# warning. This can be preseeded away...
d-i partman-lvm/device_remove_lvm boolean true
# And the same goes for the confirmation to write the lvm partitions.
d-i partman-lvm/confirm boolean true
d-i partman-lvm/confirm_nooverwrite boolean true
To make the installer put all files in a single partition and create the disk partitions without being prompted for confirmation add the following configurations:
1
2
3
4
5
6
7
8
9
10
11
12
# You can choose one of the three predefined partitioning recipes:
# - atomic: all files in one partition
# - home:   separate /home partition
# - multi:  separate /home, /var, and /tmp partitions
d-i partman-auto/choose_recipe select atomic

# This makes partman automatically partition without confirmation, provided
# that you told it what to do using one of the methods above.
d-i partman-partitioning/confirm_write_new_label boolean true
d-i partman/choose_partition select finish
d-i partman/confirm boolean true
d-i partman/confirm_nooverwrite boolean true
Since I am installing Debian in a VM with UEFI firmware, I will add the following configurations to ensure UEFI booting and ensure the partition table is GPT:
1
2
3
4
5
6
7
8
# Force UEFI booting ('BIOS compatibility' will be lost). Default: false.
d-i partman-efi/non_efi_system boolean true
# Ensure the partition table is GPT - this is required for EFI
d-i partman-partitioning/choose_label select gpt
d-i partman-partitioning/default_label string gpt

# When disk encryption is enabled, skip wiping the partitions beforehand.
d-i partman-auto-crypto/erase_disks boolean false
Finally, add the packages you wish to the Debian environment. The difference between taskel/first and pkgsel/include is that taskel will install a package and the group of packages necessary (gnome-desktop and necessary packages for it to work), while pkgsel will only install the specified package:
1
2
3
4
5
### Package selection
tasksel tasksel/first multiselect standard, gnome-desktop

# Individual additional packages to install
d-i pkgsel/include string openssh-server build-essential vim git
Using The Preseed File
In the Debian installer menu, go to Advanced options and then select Automated install. You will be asked to issue the location of the preseed file (can be a remote location):
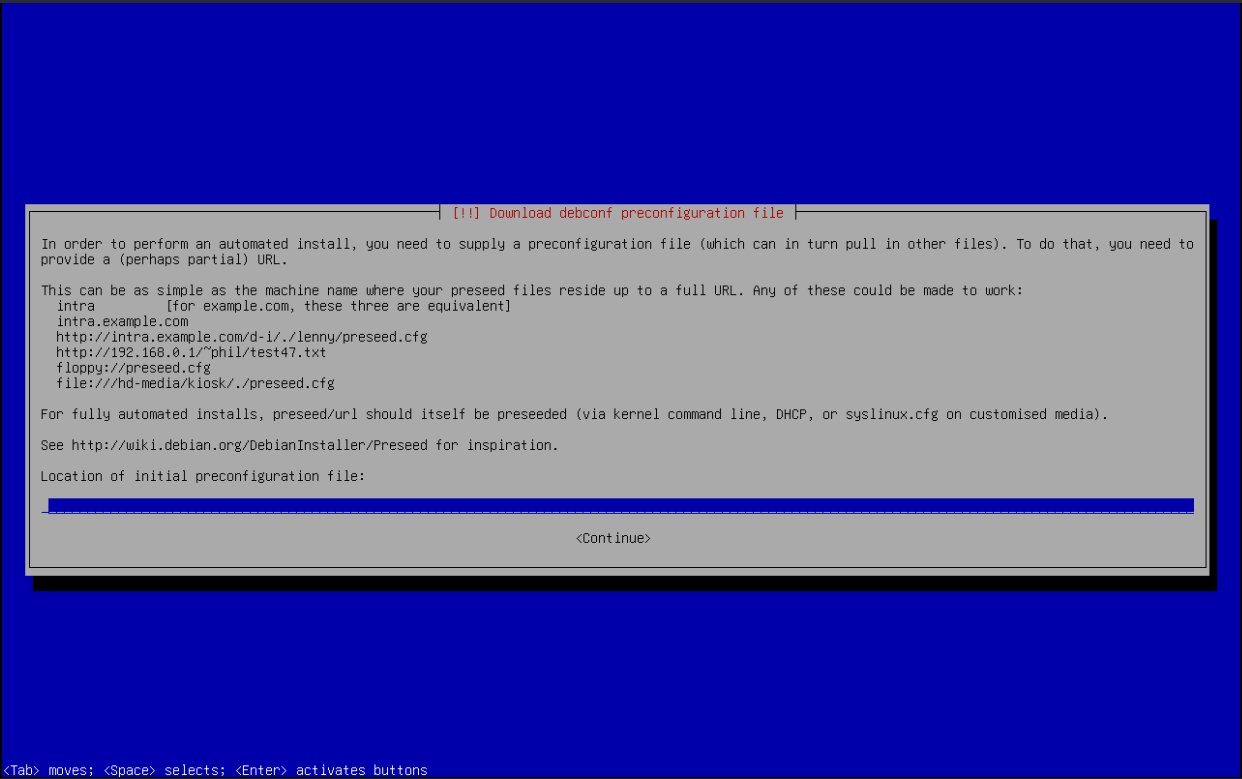
Since I am working in a VM, I created an http server to store the preseed file in there. Once you issue the route to the file, the automated installation will begin.
Final Thoughts
Preseed files are an attractive feature Debian offers to automate the installation process. The syntax used is pretty clear since it is similar to shell scripts, however, there is not a lot of documentation about all the options you can put in the file such as the encryption passphrase.